With Mountain Lion set for a July release, Gizmag offers some tips on backing up, cleaning up and optimizing your Mac to make the upgrade process go as smoothly as can be for those wishing to adopt Apple's latest "big cat."
The OS X upgrade process has been refined over the years and is now so simple as to only require a visit to the Mac App Store to purchase, download and install Mountain Lion. However, it's still advisable to ensure your Mac is fully updated and backed-up before upgrading an operating system, just in case.
Remember that some applications could cease to work, or become unstable, with a new iteration of OS X. The Mac App Store has sped up the process for developers who wish to update their apps, but many non-Mac App Store apps will still lag behind, so before proceeding, check out this handy compatibility table by Roaring Apps and make sure your most important apps are ready for Mountain Lion.
Backing up

Time Machine is an excellent backup utility which has shipped with Mac OS X since Leopard. However, in addition to using Time Machine, it can be beneficial to consider making a clone of one's hard drive.
By making use of a utility such as the shareware application Carbon Copy Cloner, we can copy the entire contents of our hard drive onto an external hard drive. This will give us the ability to boot from that backup and find everything as we left it if something catastrophic happens to the original data. Indeed, even if the original computer is lost, you can still boot into your external hard drive, providing you can find a similar model Mac to your own.
Carbon Copy Cloner lacks Time Machine's sheen and ease of use, but its basic cloning feature is still fairly simple to use: just navigate to the relevant download page and install the app, then ensure you have an empty hard drive partition to copy the data to. Once this is done, select the correct source and destination, then wait while Carbon Copy Cloner does its thing. Be warned that, if using an external USB hard drive and a lot of data, this can take some time.
Spring cleaning
There's no need to remove applications or files just because an operating system upgrade is looming. However, we often collect unwanted apps and media files over the years, so Mountain Lion's imminent release is as an opportune time to clear out any clutter.
There is already a handy storage utility built into OS X Lion and to make use of it navigate to:
About This Mac, More Info, and then click on the Storage tab.

This will bring up the above information screen, from which we can see an overview of the kind of files which reside on our hard drive and decide whether or not those four seasons of The Sopranos are really worth the extra space they take up.
Mac users tend to delete their applications by simply performing a drag-and-drop to the Trash. There's nothing at all wrong with this method but it can leave behind harmless hidden files which can, on occasion, rise to hundreds of megabytes in size. To prevent this, we can use a very lightweight, unobtrusive and free application called AppTrap which will bring up a prompt every time a user attempts to delete a file, asking if the user would like those additional hidden files to also be removed.

In addition, OS X makes use of cache files to speed up applications and over time these cache files can grow in size, taking up valuable room. There are two widely-recommended apps which help in the process of removing such cache files: Onyx and CleanMyMac. Both applications are very useful and do largely the same thing, but though Onyx is free it's perhaps a little less intuitive than its competitor.
Creating a Mountain Lion DVD or external install drive
The arrival of OS X Lion heralded a new digital-only era of operating system delivery for Apple, but not everybody is comfortable ditching an install drive and there are still several situations where it comes in useful, such as when upgrading several Macs at once or performing a clean install of OS X. First, a disclaimer: we're getting this out to you ahead of time, and though we think it's unlikely, it's perfectly possible that Apple could change the Mountain Lion installation process so that the following instructions no longer work. That said...
Burn a Mountain Lion DVD
Begin by visiting the Mac App Store and purchasing Mountain Lion. Let Mountain Lion download but before installing the operating system, navigate to your Applications folder and right-click on Mountain Lion’s installer.
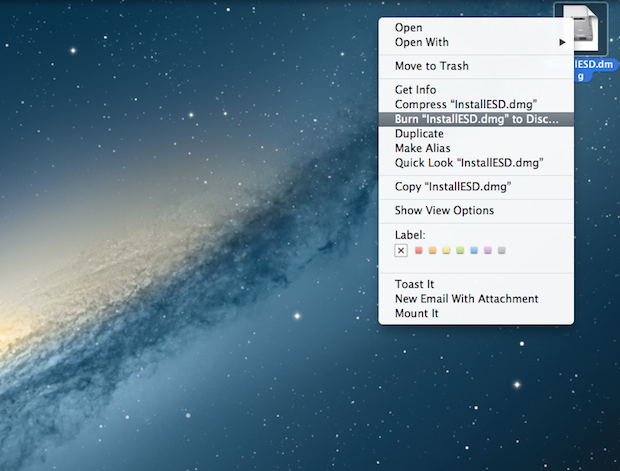
Now choose "Show Package Contents" from the right-click menu and open the folder titled "Shared Support". Within this folder there should be an image titled "InstallESD.dmg" or something very similar. This .dmg file is the Mountain Lion disc image, so copy it onto the Desktop folder and create a DVD by right-clicking the .dmg file then selecting "Burn" from the menu.
Create a Mountain Lion external install drive
If you'd prefer to create a Mountain Lion external install drive with an external hard drive or USB stick, follow the above instructions to get the .dmg image file on the Desktop and then rename the .dmg image to (without quotes) "Mountain Lion.dmg". Double click the Mountain Lion.dmg image to mount it.

Before proceeding any further, we'll need to prepare an external hard drive or USB stick with roughly 8 GB of free space. Providing this is available and plugged into the Mac, continue onward.
Open Disk Utility and select Mountain Lion.dmg file from the left hand pane. Select “Restore” from the right hand pane and ensure that the “Destination” box contains the desired hard drive or USB which is to become the install drive, and that the “Erase destination” box is ticked.
Drag the image file titled Mountain Lion.dmg over from the left pane to the “Source” box. It will now be named "Mac OS X Install ESD". Make sure everything looks correct, matching up with the screenshot above and click “Restore”.
After some minutes you should now have a Mountain Lion install drive. To boot from this drive, switch on your Mac while holding down the "alt" key, then choose it from the prompt which will then appear. Now you may install Mountain Lion normally.
Upgrading your Mac hardware
The minimum specifications which a Mac needs to meet in order to run Mountain Lion are relatively low and most Macs will either already meet those needs or else be shut out by Apple's contentious decision to cut off support to older Macs. That said, if you would like to take the opportunity of Mountain Lion’s impending launch to upgrade your Mac, here’s a couple of common-sense hardware upgrades.
RAM
Random-access memory (RAM) is the working memory which OS X makes use of in order to run several applications at once. If you’re running any resource-heavy applications such as Adobe Photoshop, you’re likely to notice an increase in performance following an upgrade. Unfortunately, MacBook Air users are unable to upgrade, because in the bid to make the ultra-portable notebook as slim as possible, Apple soldered the Air's RAM to the motherboard, rendering it non-upgradeable. For the rest of us, however, RAM is an easy and (relatively) cheap upgrade. Crucial Memory makes it easy to choose which kind of RAM you need, though there are many other places which sell RAM too. Detailed instructions on installation can be found at the informative iFixit.
SSD

While RAM can give you a noticeable performance boost for relatively little money, a solid-state drive (SSD) will really make your Mac fly. Applications will load quicker, your Mac will boot in seconds and everything will simply feel faster overall. As opposed to classic hard drives, SSDs contain no moving parts and use Flash memory, making them silent and very fast. The cost of SSD’s has fallen significantly, but it can still be an expensive or impractical proposition if you have a lot of media to store.
There are many SSDs to choose from and your own choice will depend on personal preferences and budget, but two recommended models include the latest Crucial Memory SSD offering and the Samsung 830 Series. Installing an SSD into any Mac (besides the MacBook Air) should be a simple process and, again, iFixit has instructions for doing so.
If you’d like to copy all your existing data to an SSD then you can use Carbon Copy Cloner to clone your hard drive, then copy that data onto the new SSD. Just be sure to read Carbon Copy Cloner's help text for more information before getting started.