Electronics

Daily Brick's Lego iPad Dock Kit: Review + assembly guide

Daily Brick's Lego iPad Dock Kit: Review + assembly guide
The Daily Brick's Lego iPad Dock Kit (Photo: Gizmag)
View 97 Images
The Daily Brick's Lego iPad Dock Kit (Photo: Gizmag)
1/97
The Daily Brick's Lego iPad Dock Kit (Photo: Gizmag)
Rear view (Photo: Gizmag)
2/97
Rear view (Photo: Gizmag)
Side view (Photo: Gizmag)
3/97
Side view (Photo: Gizmag)
Docked! (Photo: Gizmag)
4/97
Docked! (Photo: Gizmag)
Close-up rear view (Photo: Gizmag)
5/97
Close-up rear view (Photo: Gizmag)
There's a bit of a knack to docking, but it's less fiddly than it might be (Photo: Gizmag)
6/97
There's a bit of a knack to docking, but it's less fiddly than it might be (Photo: Gizmag)
The dock is compact yet sturdy (Photo: Gizmag)
7/97
The dock is compact yet sturdy (Photo: Gizmag)
With it's compact size and lack of speakers, it's a viable option for bringing an iPad into a desk setup (Photo: Gizmag)
8/97
With it's compact size and lack of speakers, it's a viable option for bringing an iPad into a desk setup (Photo: Gizmag)
9/97
With it's compact size and lack of speakers, it's a viable option for bringing an iPad into a desk setup (Photo: Gizmag)
Assembly guide step zero: unpacking (Photo: Gizmag)
10/97
Assembly guide step zero: unpacking (Photo: Gizmag)
11/97
Assembly guide step zero: unpacking (Photo: Gizmag)
Assembly guide step 1 (Photo: Gizmag)
12/97
Assembly guide step 1 (Photo: Gizmag)
Assembly guide step 2 (Photo: Gizmag)
13/97
Assembly guide step 2 (Photo: Gizmag)
Assembly guide step 3 (Photo: Gizmag)
14/97
Assembly guide step 3 (Photo: Gizmag)
Assembly guide step 4 (Photo: Gizmag)
15/97
Assembly guide step 4 (Photo: Gizmag)
Assembly guide step 5 (Photo: Gizmag)
16/97
Assembly guide step 5 (Photo: Gizmag)
Assembly guide step 6 (Photo: Gizmag)
17/97
Assembly guide step 6 (Photo: Gizmag)
Assembly guide step 7 (Photo: Gizmag)
18/97
Assembly guide step 7 (Photo: Gizmag)
Assembly guide step 8 (Photo: Gizmag)
19/97
Assembly guide step 8 (Photo: Gizmag)
Assembly guide step 9 (Photo: Gizmag)
20/97
Assembly guide step 9 (Photo: Gizmag)
Assembly guide step 10 (Photo: Gizmag)
21/97
Assembly guide step 10 (Photo: Gizmag)
Assembly guide step 11 (Photo: Gizmag)
22/97
Assembly guide step 11 (Photo: Gizmag)
Assembly guide step 12 (Photo: Gizmag)
23/97
Assembly guide step 12 (Photo: Gizmag)
Assembly guide step 13 (Photo: Gizmag)
24/97
Assembly guide step 13 (Photo: Gizmag)
Assembly guide step 14 (Photo: Gizmag)
25/97
Assembly guide step 14 (Photo: Gizmag)
Assembly guide step 15 (Photo: Gizmag)
26/97
Assembly guide step 15 (Photo: Gizmag)
Assembly guide step 16 (Photo: Gizmag)
27/97
Assembly guide step 16 (Photo: Gizmag)
Assembly guide step 17 (Photo: Gizmag)
28/97
Assembly guide step 17 (Photo: Gizmag)
Assembly guide step 18 (Photo: Gizmag)
29/97
Assembly guide step 18 (Photo: Gizmag)
Assembly guide step 19 (Photo: Gizmag)
30/97
Assembly guide step 19 (Photo: Gizmag)
Assembly guide step 20 (Photo: Gizmag)
31/97
Assembly guide step 20 (Photo: Gizmag)
Assembly guide step 21 (Photo: Gizmag)
32/97
Assembly guide step 21 (Photo: Gizmag)
Assembly guide step 22 (Photo: Gizmag)
33/97
Assembly guide step 22 (Photo: Gizmag)
Assembly guide step 23 (Photo: Gizmag)
34/97
Assembly guide step 23 (Photo: Gizmag)
Assembly guide step 24 (Photo: Gizmag)
35/97
Assembly guide step 24 (Photo: Gizmag)
Assembly guide step 25 (Photo: Gizmag)
36/97
Assembly guide step 25 (Photo: Gizmag)
Assembly guide step 26 (Photo: Gizmag)
37/97
Assembly guide step 26 (Photo: Gizmag)
Assembly guide step 27 (Photo: Gizmag)
38/97
Assembly guide step 27 (Photo: Gizmag)
Assembly guide step 28 (Photo: Gizmag)
39/97
Assembly guide step 28 (Photo: Gizmag)
Assembly guide step 29 (Photo: Gizmag)
40/97
Assembly guide step 29 (Photo: Gizmag)
Assembly guide step 30 (Photo: Gizmag)
41/97
Assembly guide step 30 (Photo: Gizmag)
Assembly guide step 31 (Photo: Gizmag)
42/97
Assembly guide step 31 (Photo: Gizmag)
Assembly guide step 32 (Photo: Gizmag)
43/97
Assembly guide step 32 (Photo: Gizmag)
Assembly guide step 33 (Photo: Gizmag)
44/97
Assembly guide step 33 (Photo: Gizmag)
Assembly guide step 34 (Photo: Gizmag)
45/97
Assembly guide step 34 (Photo: Gizmag)
Assembly guide step 35 (Photo: Gizmag)
46/97
Assembly guide step 35 (Photo: Gizmag)
Assembly guide step 36 (Photo: Gizmag)
47/97
Assembly guide step 36 (Photo: Gizmag)
Assembly guide step 37 (Photo: Gizmag)
48/97
Assembly guide step 37 (Photo: Gizmag)
Assembly guide step 38 (Photo: Gizmag)
49/97
Assembly guide step 38 (Photo: Gizmag)
Assembly guide step 39 (Photo: Gizmag)
50/97
Assembly guide step 39 (Photo: Gizmag)
Assembly guide step 40 (Photo: Gizmag)
51/97
Assembly guide step 40 (Photo: Gizmag)
Assembly guide step 41 (Photo: Gizmag)
52/97
Assembly guide step 41 (Photo: Gizmag)
Assembly guide step 42 (Photo: Gizmag)
53/97
Assembly guide step 42 (Photo: Gizmag)
Assembly guide step 43 (Photo: Gizmag)
54/97
Assembly guide step 43 (Photo: Gizmag)
Assembly guide step 44 (Photo: Gizmag)
55/97
Assembly guide step 44 (Photo: Gizmag)
Assembly guide step 45 (Photo: Gizmag)
56/97
Assembly guide step 45 (Photo: Gizmag)
Assembly guide step 46 (Photo: Gizmag)
57/97
Assembly guide step 46 (Photo: Gizmag)
Assembly guide step 47 (Photo: Gizmag)
58/97
Assembly guide step 47 (Photo: Gizmag)
Assembly guide step 48 (Photo: Gizmag)
59/97
Assembly guide step 48 (Photo: Gizmag)
Assembly guide step 49 (Photo: Gizmag)
60/97
Assembly guide step 49 (Photo: Gizmag)
Assembly guide step 50 (Photo: Gizmag)
61/97
Assembly guide step 50 (Photo: Gizmag)
Assembly guide step 51 (Photo: Gizmag)
62/97
Assembly guide step 51 (Photo: Gizmag)
Assembly guide step 52 (Photo: Gizmag)
63/97
Assembly guide step 52 (Photo: Gizmag)
Assembly guide step 53 (Photo: Gizmag)
64/97
Assembly guide step 53 (Photo: Gizmag)
Assembly guide step 54 (Photo: Gizmag)
65/97
Assembly guide step 54 (Photo: Gizmag)
Assembly guide step 55 (Photo: Gizmag)
66/97
Assembly guide step 55 (Photo: Gizmag)
Assembly guide step 56 (Photo: Gizmag)
67/97
Assembly guide step 56 (Photo: Gizmag)
Assembly guide step 57 (Photo: Gizmag)
68/97
Assembly guide step 57 (Photo: Gizmag)
Assembly guide step 58 (Photo: Gizmag)
69/97
Assembly guide step 58 (Photo: Gizmag)
Assembly guide step 59 (Photo: Gizmag)
70/97
Assembly guide step 59 (Photo: Gizmag)
Assembly guide step 60 (Photo: Gizmag)
71/97
Assembly guide step 60 (Photo: Gizmag)
Assembly guide step 61 (Photo: Gizmag)
72/97
Assembly guide step 61 (Photo: Gizmag)
Assembly guide step 62 (Photo: Gizmag)
73/97
Assembly guide step 62 (Photo: Gizmag)
Assembly guide step 63 Photo: Gizmag)
74/97
Assembly guide step 63 Photo: Gizmag)
Assembly guide step 64 (Photo: Gizmag)
75/97
Assembly guide step 64 (Photo: Gizmag)
Assembly guide step 65 (Photo: Gizmag)
76/97
Assembly guide step 65 (Photo: Gizmag)
Assembly guide step 66 (Photo: Gizmag)
77/97
Assembly guide step 66 (Photo: Gizmag)
Assembly guide step 67 (Photo: Gizmag)
78/97
Assembly guide step 67 (Photo: Gizmag)
Assembly guide step 68 (Photo: Gizmag)
79/97
Assembly guide step 68 (Photo: Gizmag)
Assembly guide step 69 (Photo: Gizmag)
80/97
Assembly guide step 69 (Photo: Gizmag)
Assembly guide step 70 (Photo: Gizmag)
81/97
Assembly guide step 70 (Photo: Gizmag)
Assembly guide step 71 (Photo: Gizmag)
82/97
Assembly guide step 71 (Photo: Gizmag)
Assembly guide step 72 (Photo: Gizmag)
83/97
Assembly guide step 72 (Photo: Gizmag)
Assembly guide step 73 (Photo: Gizmag)
84/97
Assembly guide step 73 (Photo: Gizmag)
Assembly guide step 74 (Photo: Gizmag)
85/97
Assembly guide step 74 (Photo: Gizmag)
Assembly guide step 75 (Photo: Gizmag)
86/97
Assembly guide step 75 (Photo: Gizmag)
Assembly guide step 76 (Photo: Gizmag)
87/97
Assembly guide step 76 (Photo: Gizmag)
Assembly guide step 77 (Photo: Gizmag)
88/97
Assembly guide step 77 (Photo: Gizmag)
Assembly guide step 78 (Photo: Gizmag)
89/97
Assembly guide step 78 (Photo: Gizmag)
Assembly guide step 79 (Photo: Gizmag)
90/97
Assembly guide step 79 (Photo: Gizmag)
Assembly guide step 80 (Photo: Gizmag)
91/97
Assembly guide step 80 (Photo: Gizmag)
Assembly guide step 81 (Photo: Gizmag)
92/97
Assembly guide step 81 (Photo: Gizmag)
Assembly guide step 82 (Photo: Gizmag)
93/97
Assembly guide step 82 (Photo: Gizmag)
Assembly guide step 83 (Photo: Gizmag)
94/97
Assembly guide step 83 (Photo: Gizmag)
Assembly guide step 84 (Photo: Gizmag)
95/97
Assembly guide step 84 (Photo: Gizmag)
Assembly guide step 85 (Photo: Gizmag)
96/97
Assembly guide step 85 (Photo: Gizmag)
Assembly guide step 86 (Photo: Gizmag)
97/97
Assembly guide step 86 (Photo: Gizmag)
View gallery - 97 images

When Lego kit specialist The Daily Brick made contact to see if we'd like to review its Lego iPad Dock Kit for Retina or iPad mini, bits were champed. This was partially because I don't actually have a Lightning dock for my Retina iPad, and partially because… you know… Lego. But as fun as Lego is, most of the joy is in the building. Is a Lego dock really up to the rigors of daily use? Gizmag built one to find out.

At the risk of hitting you over the head with the obvious stick, though Lightning-connector docks for Retina iPads and iPhone 5 are few in number, they do exist. If you're looking for one with integrated speakers to play music with more heft and fidelity than the iPad's own speakers, this dock, being made out of lumps of plastic, isn't it. But, if you're after a dock to quickly plonk your iPad on for a bit of charge, or prop it up at a useful angle, or to put next to a computer, the Daily Brick's dock is well worth some consideration.

Close-up rear view (Photo: Gizmag)

First, this takes no time to build. Inside the Jiffy bag, along with the three plastic bags of little black bricks, you'll find a sticker pointing you to instructions at the Daily Brick website. These are much improved from the online instructions that went along with the Raspberry Pi case I built. Those used computer-rendered images that didn't show the lines between the bricks when put together. This is all great larks if you're in the mood for a puzzle, but if you're hoping to get something built, the Daily Brick's photo guides are much easier to follow. Though improved, the instructions were not entirely without ambiguity. But building it is fun, which is important, because this is Lego we're talking about.

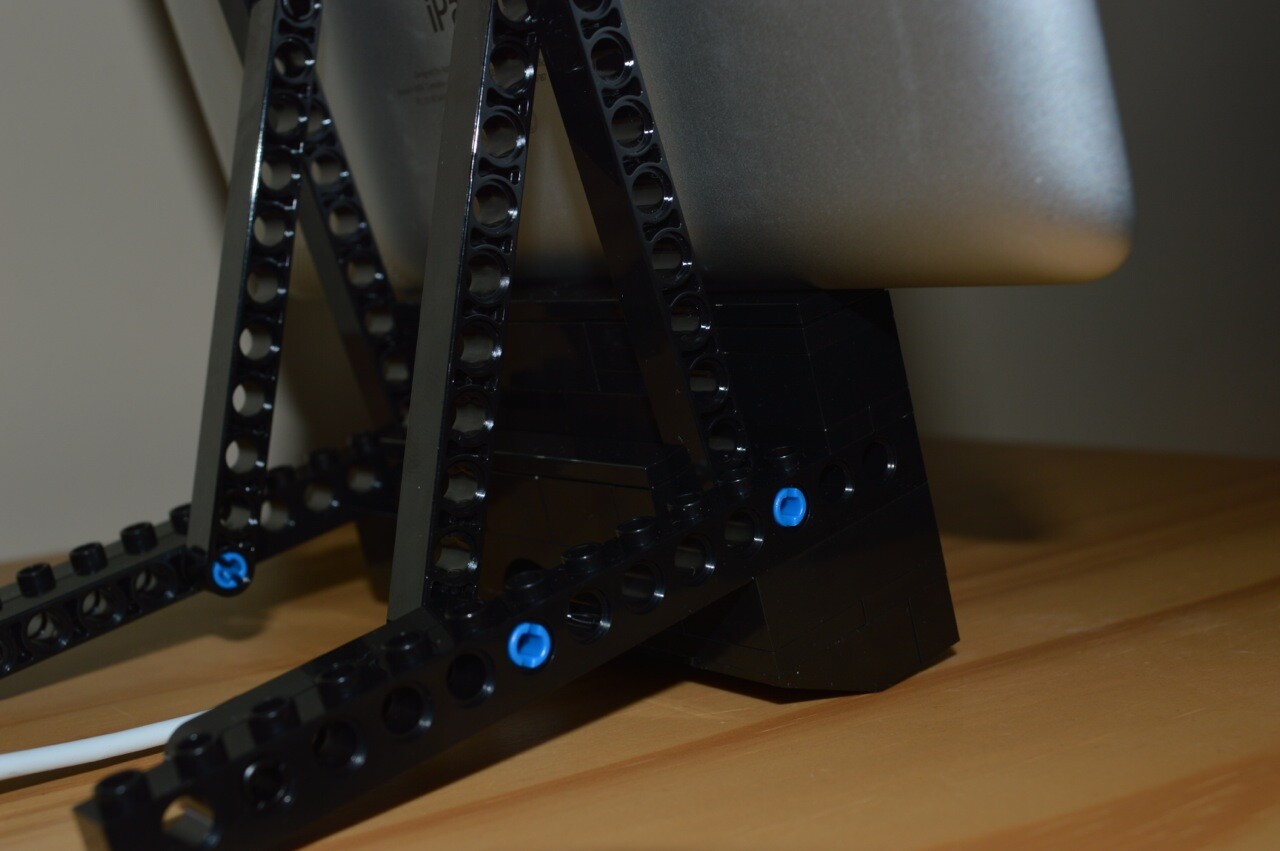
Complete, the dock is surprisingly sturdy. If you drop it, there is some chance it will break, but if it does, it will break into whole pieces which you can put back together yourself. Drop a more expensive dock and it may not break, but if it does, repair won't be so easy. But most importantly, the dock doesn't decide to split in two every time you remove the iPad. You do have to hold it with one hand because it's so light, but that's all. It's structurally well designed.

There are no in-built guides, rails or tracks to make docking the iPad idiot-proof, but actually, putting the iPad onto it is surprisingly easy. The trick is simply to line up the iPad's home button with the Lightning connector, which is held firm by two of those hooked grippy Lego pieces which seem almost tailored to holding the cable. There's a bit of depth perception to factor in, and so it's quite a bit easier to dock nearer eye level (i.e. on a desk you're sitting at) rather than from above (i.e. a coffee table you're standing over). It's not absolutely ideal, but with a bit of practice you should be able to dock first time, averting annoyance.

With the iPad in place, the dock stands perfectly stably, despite being compact. This is a major advantage of the lack of speakers. It doesn't take up much space.

If there's one dead fly in the otherwise deliciously fruity raisin bread that is the Lego iPad dock, it's the length of Apple's Lightning connector. The dock requires you to build your cable into it, as it were, so it's worth taking a moment to wonder if you'll need to order a spare to build the dock into your current charging regime. My iPad is purely recreational, my charge patterns scatter-shot, and so I was happy to devote my cable to the dock. However, the standard 1-meter cable does rather limit where you can put it.

With it's compact size and lack of speakers, it's a viable option for bringing an iPad into a desk setup (Photo: Gizmag)

Though it looks as if the iPad now fits cozily into my arrangement of work stuff, the cable won't actually reach far enough around the back of my monitor to my computer. All the monitor's USB ports are busy, and the cable won't reach through the grommet to my power supply. I'm sorely tempted to order a 3-meter third-party Lightning cable, and that's testament to the Lego dock: It's something I want to use.

To conclude by wrapping up in an overall summary, then: this is useful, fun (that's Lego-fun, which counts double), cool (Lego-cool, which counts triple), and though not exactly cheap (Lego never is, unfortunately), it's certainly inexpensive compared to other docks.

The Daily Brick iPad Dock Kit costs £19.95 (about US$31). They also ship an iPhone 5 Dock Kit for £11.95 ($18.50).

A final note: Though Daily Brick's instructions are straightforward to follow, there's a completely cretin-proof assembly guide in this article's image gallery. I had to partially disassemble the dock at one stage, because a join (or lack of one) was obscured in one of the Daily Brick's pictures, making it impossible to tell which piece or pieces were used (you'd have to be stupid to choose the wrong ones, though, so naturally, I did). The Gizmag gallery shows you which pieces will be added at each stage, before showing where they go, in case you're as stupid as I am.

Product pages: iPad Dock Kit, iPhone 5 Dock Kit

View gallery - 97 images
No comments
0 comments
There are no comments. Be the first!